Report Editor 
See also: User Interface
Topic Menu

|
Report Editor |
This feature allows the OCS to be configured to generate text printouts which incorporate data from the register/array elements embedded in the text. The reports can be printed using a serial interface printer through any of the serial ports of the OCS or can be saved to the removable media of the device.
Note: Currently only text-based reports are supported. Up to 48 individual reports can be configured.
-
Currently only text-based reports are supported. Up to 48 individual reports can be configured.
-
If unicode characters are configured in reports then from Cscape 10.2 onwards, message is displayed for not supporting unicode characters during compilation.
Accessing the Report Editor
The Report Editor can be accessed one of two ways:
-
Option A: Through the Home Menu > Data > Reports
-
Option B: The Project Navigator: Home Menu > Project Navigator > User Interface > Reports
Creating a Report
Open the Report Editor by selecting Reports from the Programs Ribbon. It can also be opened using the Project Navigator.
Project Navigator > User Interface > Report
Report Editor Toolbar Buttons
-
To Configure a printer
-
To Configure Trigger Bit
-
Create a new Report
-
Delete currently selected report (after confirmation)
-
Select Previous Report/Next Report. Move through the reports in the program.
-
Insert a new line/ Delete a line at the cursor position
-
Cut/Copy/Paste. Standard windows functionality.
-
Data is saved to the clipboard in text format allowing easy transfer to other applications.
-
Launch Context Help
‘Text’ menu when undocked (fix) Animation Toolbar buttons
|
Tool / Icon |
Description |
|---|---|

|
To embed and configure Numeric Data in the report. |

|
To embed and configure Timer Data in the report. |

|
To embed and configure ASCII |

|
To embed and configure Text Table Data in the report. |

|
To embed and configure Time Data in the report. |
Report Editor Menu Bar
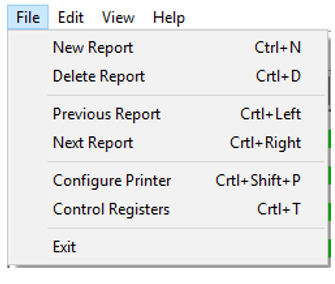
File

|
File Menu |
|
|---|---|
|
New Report |
To create a new report |
|
Delete Report |
To delete the current report |
|
Previous Report |
To display the previous report |
|
Next Report |
To display the next report |
|
Configure Printer |
To configure the printer |
|
Control Registers |
To configure the trigger bits for a report |
|
Exit |
To exit the Report Editor |
Configuring a Printer
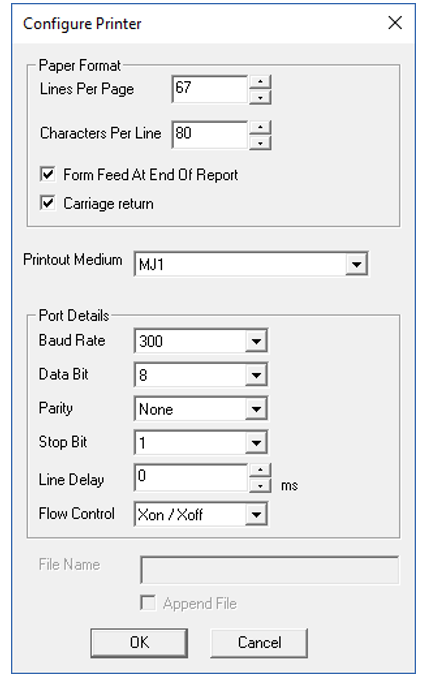
In Report Editor > File Menu > Configure Printer or select Printer Icon.
Selecting either of these opens the Configure Printer dialog:
-
Lines Per Page: 1-240
-
Characters Per Line: 10-132
-
Form Feed at End of Report: When checked will cause a form feed command to be sent to the printer once the report has been printed.
-
Carriage Return: When checked will cause a carriage return command to be sent to the printer once the report has been printed.
-
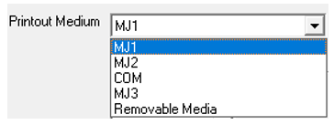
The user can select the Printout Medium as desired from the drop-down list:
-
Select an available Serial Port or Removable Media. Cscape lists all the available serial ports in the drop-down depending on the model selected in the Hardware Configuration.
Port Details
When serial port is selected as the Printout Medium, Baud rate, data bits, parity, stop bits, Line Delay (0-200ms) and flow control are configurable from the drop-down lists. Refer to printer setup for appropriate values.
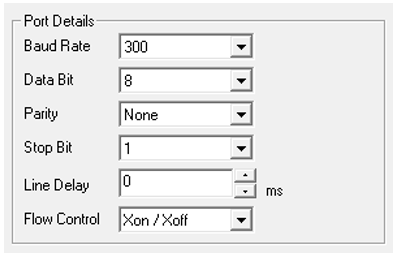
The line delay allows a pause to occur for every line printed to the printer. This gives time for the printer to print the line and reset its (possessive form) print head to the start of the line. This can be useful if the OCS controller serial port selection or the printer does not support a busy (CTS) signal.
File Name
When Removable Media is selected as the printout medium, a file name needs to be provided to which the printout text will be stored on the removable media. File and directory names are limited to the 8.3 convention. This is 8 characters for the name and 3 characters for an extension with a period (.) separating them.
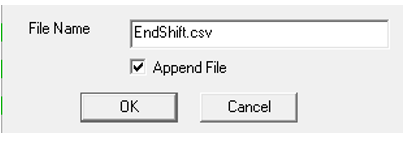
Append File
When checked, the file will be appended if already present in the Removable Media. Otherwise all data will be overwritten.
Control Register / Array Elements
From Report Editor > File Menu > Control Registers.
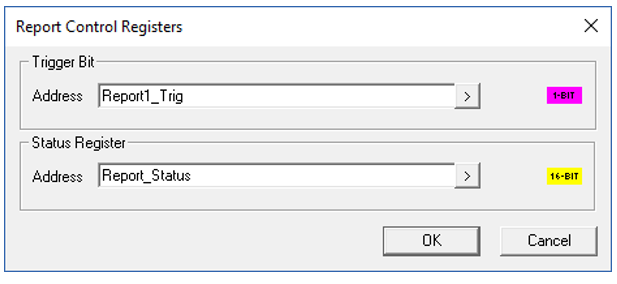
Trigger Bit - When this bit/variable is enabled, the report is printed or saved in the Removable media as per the configuration.
Note: The Firmware will reset/clear the bit once the print is over.
Report Status Register/Array element - Provides the status of report generation.
The following status codes may be reported:
|
Value (Decimal) |
Description |
|---|---|
|
01 |
Removable Media (RM) Bad Format |
|
02 |
No RM card |
|
03 |
Bad RM card |
|
04 |
RM card changed |
|
05 |
Unknown Error with RM |
|
06 |
RM Suspended |
|
07 |
RM Suspending |
|
11 |
Selected Serial Port Cannot Open |
|
12 |
Printing or writing to CF is in progress |
|
13 |
Make Directory Error |
|
14 |
File Open Error |
|
15 |
File Create Error |
|
18 |
Card Full |
|
19 |
Print Complete |
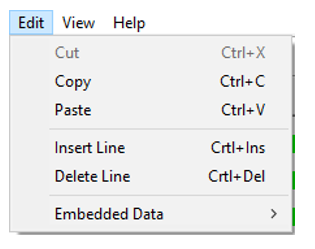
Edit
|
Edit Menu |
|
|---|---|
| Cut | To cut the embedded data from OCS register/array elements |
| Copy | To copy the embedded data from OCS register/array elements |
| Paste | To paste the embedded data from OCS register/array elements |
| Insert Line | To insert a new line into the report |
| Delete Line | To delete the current line from the current report |
| Embedded Data |
To embed different types of data into the report, see ‘Text’ menu when undocked (fix) Animation Toolbar buttons for more details.
|
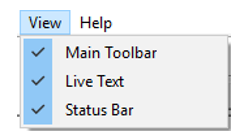
View
|
View Menu |
|
|---|---|
| Main Toolbar | To enable/disable Main Toolbar |
| Live Text | To enable/disable Live Text Toolbar |
| Status Bar | To enable/disable Status Bar |
Help
About Report Editor: This selection pops up the Report Editor dialog that contains the Report Editor Version number.
Return to the Top: Report Editor